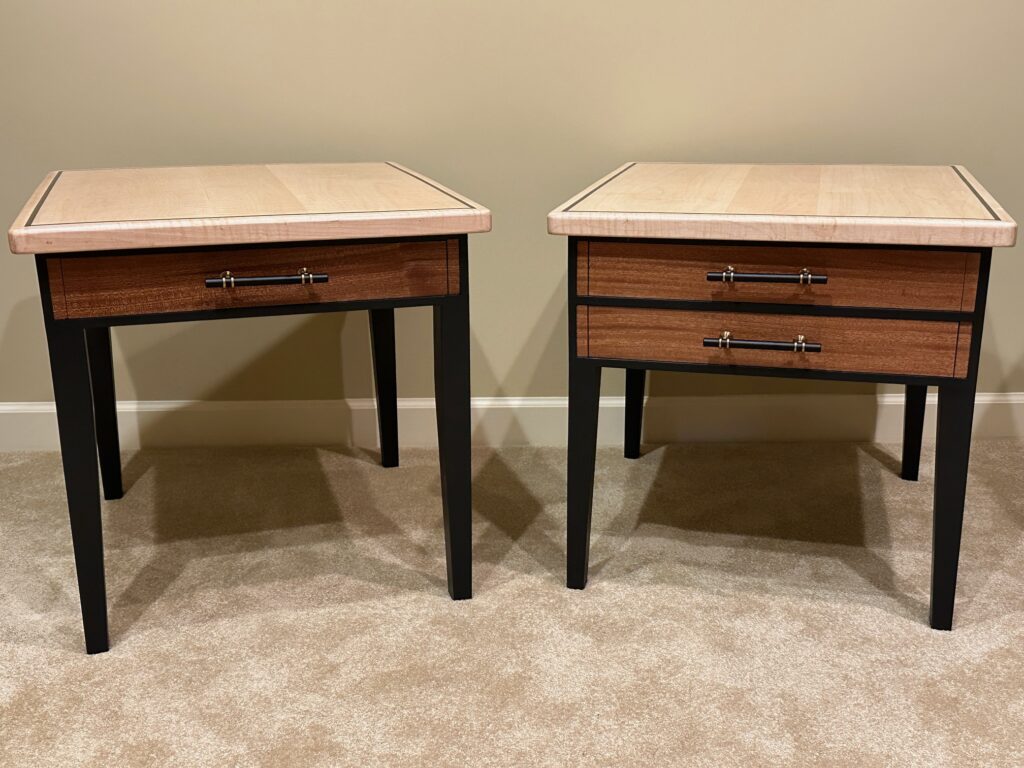
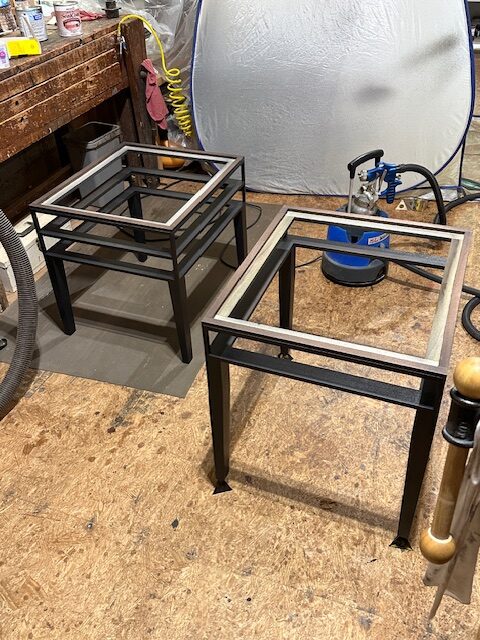
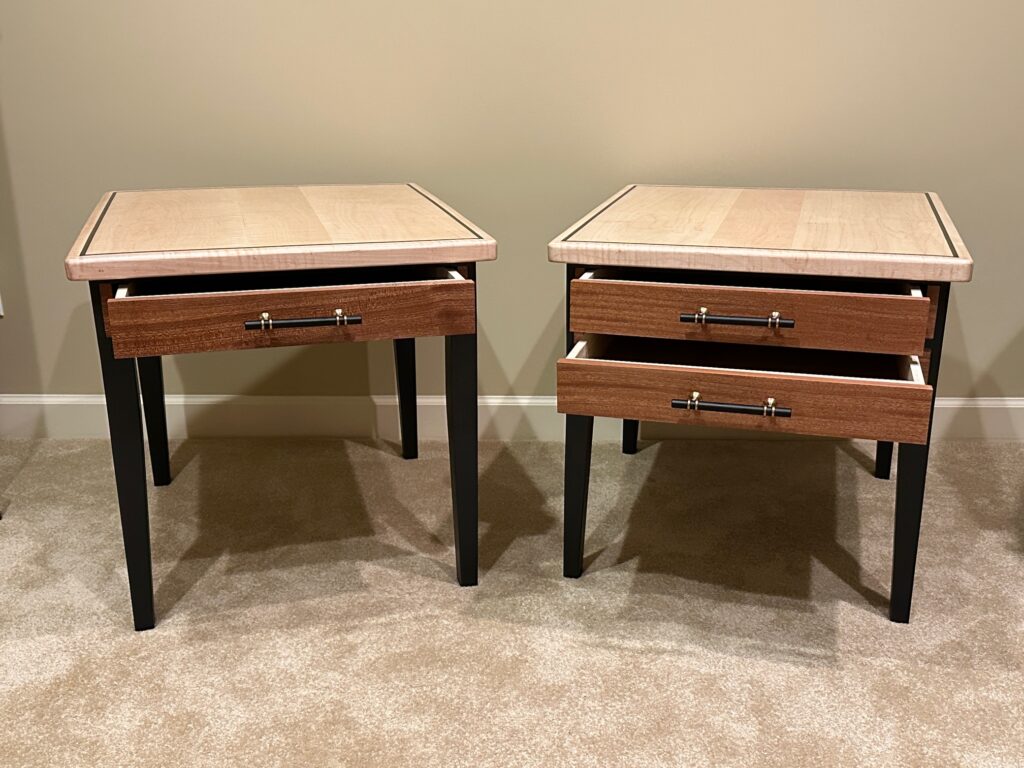
Here are two bedside stands built with one and two drawers. The black highlights match an iron bedframe. Normally the construction of wood furniture requires the primary support structure (i.e. legs, frame, top) done first. And then for decoration, trim and color are added second. No, not me! I like to make things difficult.
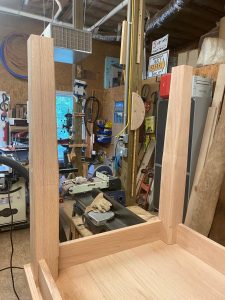
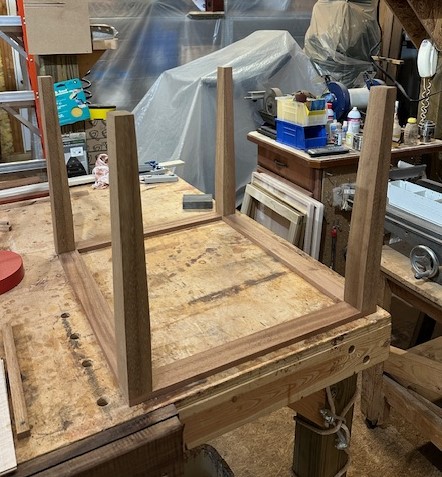
Note how the frame and trim were built initially, as shown next. This resulted in their structural strength appearing kind of flimsy and possibly questionable. Why would I build them that way? How would I make them stronger?
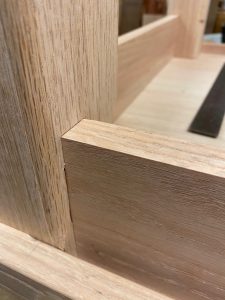
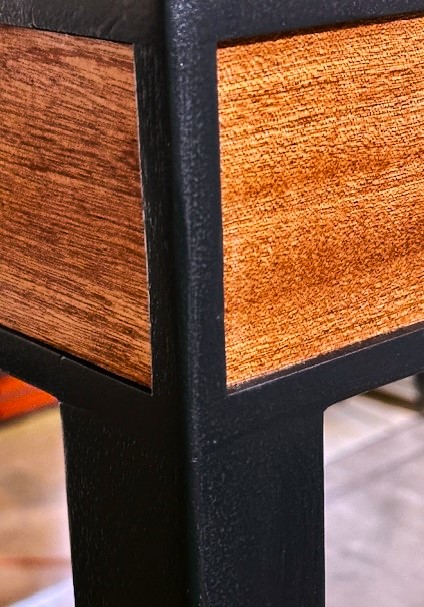
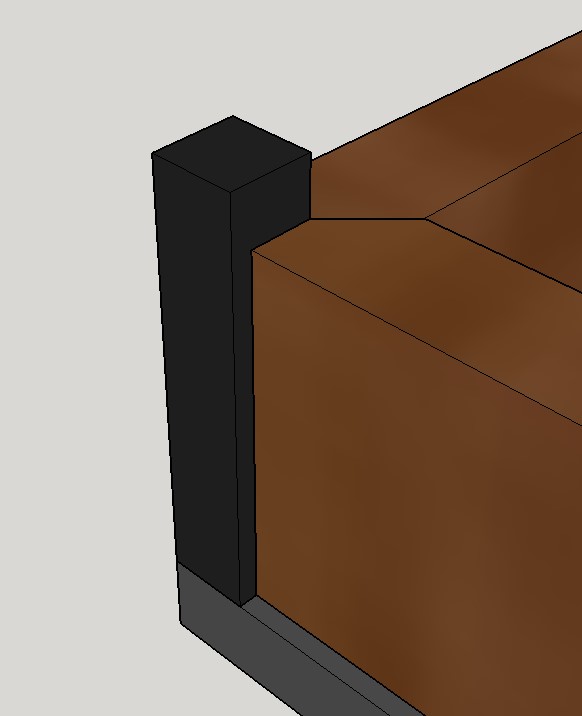
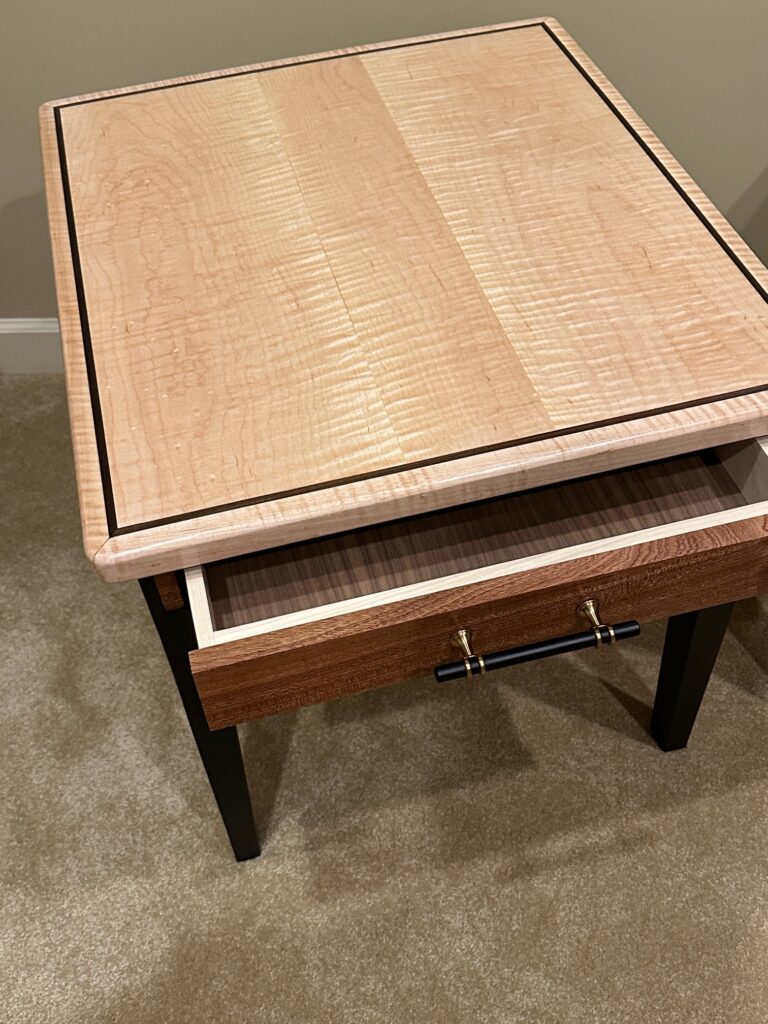
To answer the why, I wanted the black legs and trim to “flow”, to look as if they were “one” (see detail on the left). I didn’t want the trim to appear like an add-on. Because the structural support was of different wood and was to be clear-coated and not painted, I realized they had to be built in sequence. The panels (i.e. the structural component) were of Sapele wood, finished with dewaxed shellac and then lacquer. The curly maple top was also finished in the same manner.
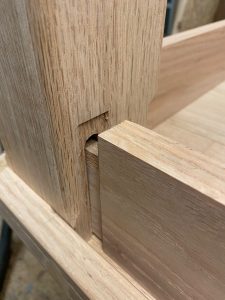
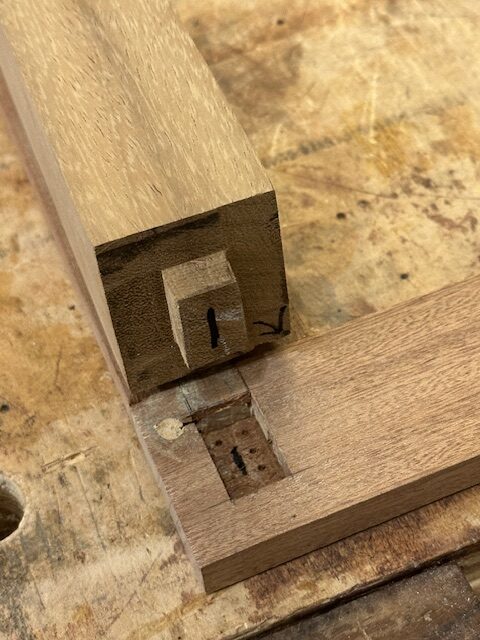
I created mortises and tenons at the leg joints for added strength before gluing. The legs were of teak wood.
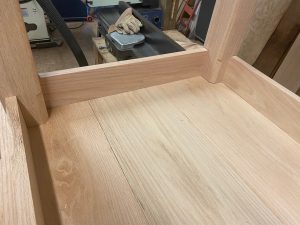
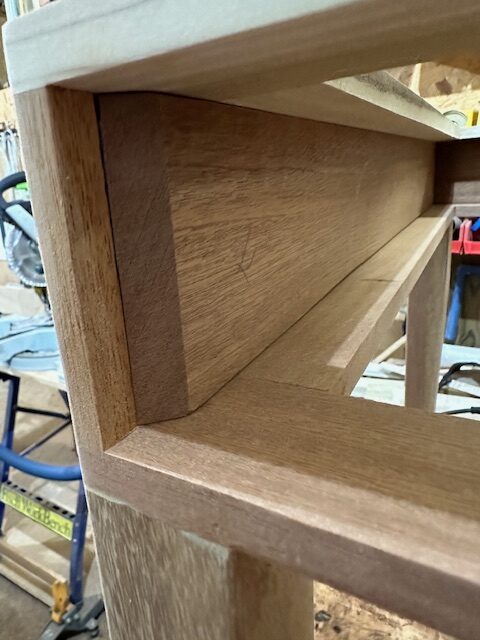
I was able to glue the panels with half-mitered joints at the corners to give added strength.
If I say so myself, they ended up okay and sitting next to the black wrought iron bed frame, they compliment one another.
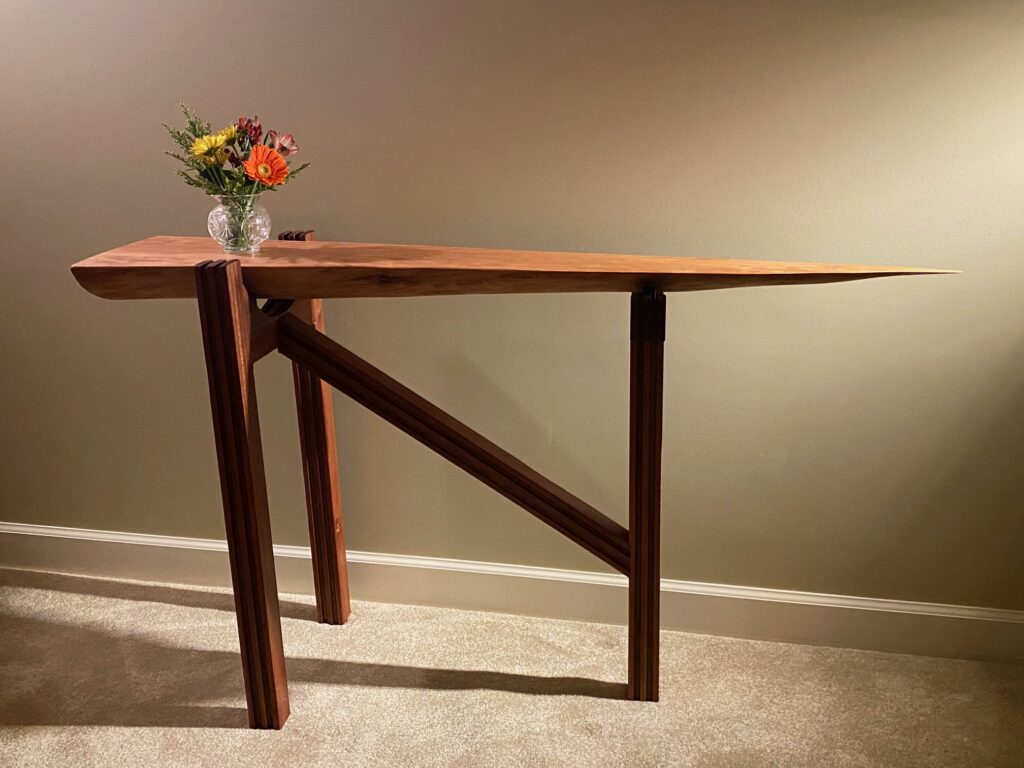
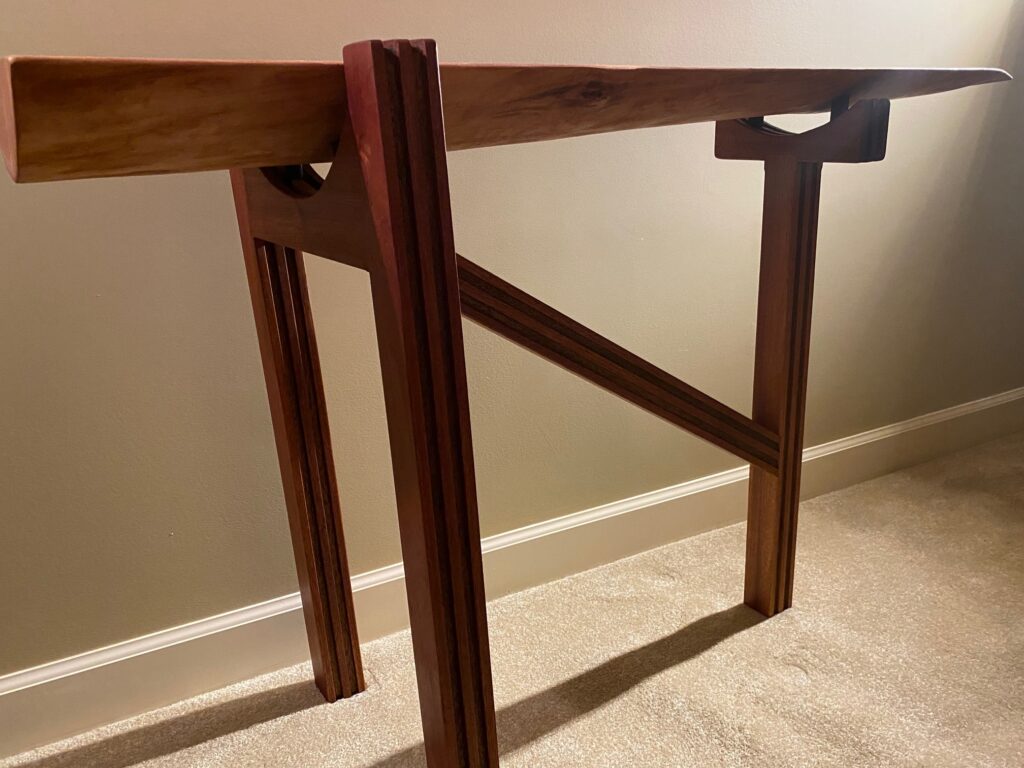
It is likely every woodworker has experienced a similar situation where a piece of wood sits in his or her woodshop waiting for an inspiration. In my case, this piece of airplane wing-shaped cherry wood had been with me for years. The part came from that portion of a tree sometimes called a “cap” which meant it was the first slice cut from a tree at a sawmill when making slabs. It is often discarded.
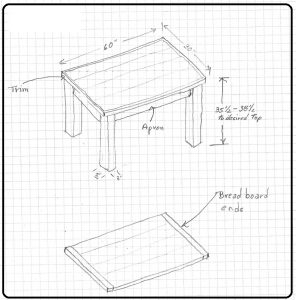
Initial drawings of hallway table
Staring out the airplane window:
Well, the inspiration finally came to me while I was on an airplane staring out the window. Knowing that it was a long flight, I had taken my sketch book and my cherished piece of wood came to mind. I started sketching various possibilities as shown in my sketchbook attempting to make a hallway table. While I call it an airplane wing, it could be a surfboard, or a spaceship or a bullet or whatever you wish to call it. But what I wanted to create was the feeling of it floating or flying.
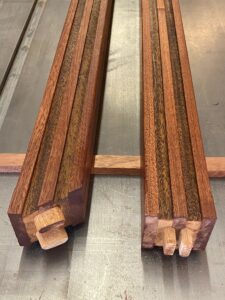
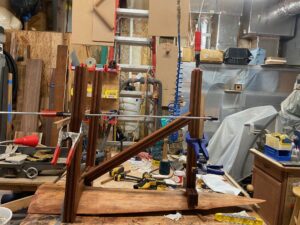
Sapele and teak legs
Construction:
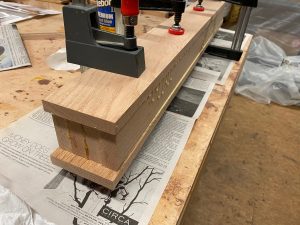
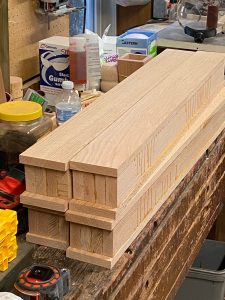
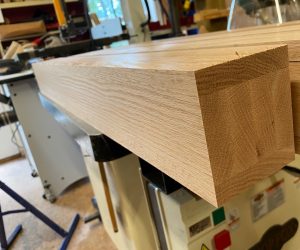
While I mentioned the tabletop was cherry wood, I used for the legs sapele on the triple layers. Because I had an abundance of teak, I filled the two inner layers with it. The gluing and laminating process is time consuming, but it makes for attractive and eye-catching designs. As I’ve mentioned in other articles, I am so fortunate to have Cormark International literally 5 miles from my studio as they are suppliers of domestic and exotic wood.
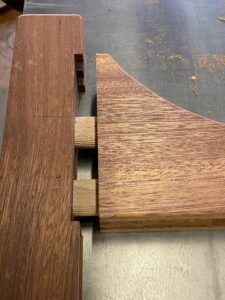
Glued mortices and tenons is a form of joinery. They make for extremely strong construction. Best yet, I got to put to use my Festool Domino Joiner, which cuts PRECISE mortices and makes alignment a lot easier.
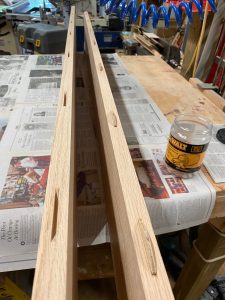
Mortice & Floating Tenon Joints
Getting the angle and the alignment of the legs and cross stretcher was the next challenge. In woodworkers’ terms, I “snuck up on it” meaning I cut the initial lengths extra-long and gradually sized them to final length and angle by cutting micro-fractions at a time until it fit to my satisfaction. The glue and clamps went on and it sat for 24 hours.
It was difficult to make sure the finished project matched my sketch as the whole-time it was upside down and once I turned it upright, it would be too late to make any modifications. I attempted to stand on my head to view it but that didn’t help. But the finished results pleased me.
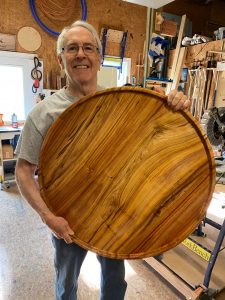
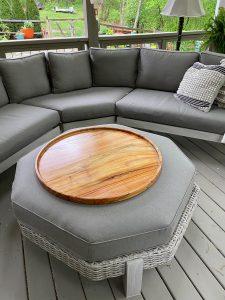
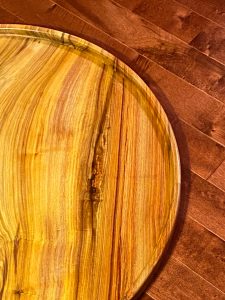
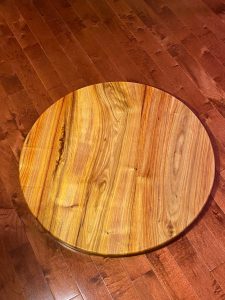
Even though it looks like a plate, it is actually a 30” diameter top for an ottoman to convert it from a cushion top to a coffee table. The yellow appearance comes from the Canarywood from Cormark International, a species found in South America.
The making of this unique “plate” took a little bit of thinking as I wanted the beautiful grain pattern to flow to the perimeter into the raised rim. There were several ways to approach this concept. One method was to find a 2” thick wood slab and remove the material in the concave surface. One does not easily find wood of this dimension and it would have been super expensive, so another approach was needed. I thought about gluing two layers of wood together, but they would have had their own unique grain pattern. This would not achieve my objective.
Sleepless Nights:
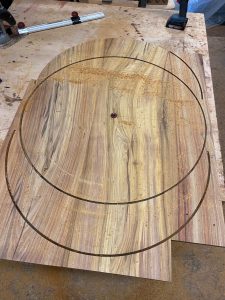
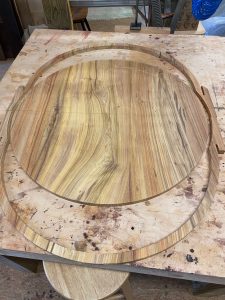
After a couple of sleep deprived nights, I finally decided to capture the grains from “extensions” of the original wood as shown in the next few photos. First, I used a router with a Milescraft Circle Guide to cut the perfect radius. By keeping the exact same radius and moving beyond the 30” diameter circle on either end, I also cut the outside radiuses for the rim. Next, I used a compass to scribe a line 1” thick which would ultimately become the rim.
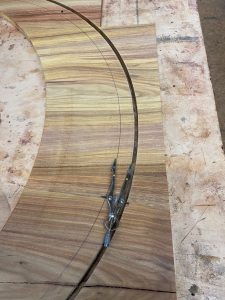
With the pencil lines drawn, I took the pieces to my bandsaw and cut just proud of the scribed line. Now I had the following configuration:
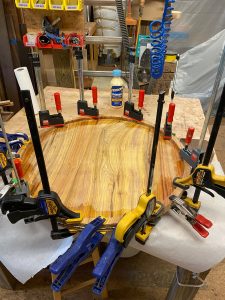
Finishing Touches:
From this point it was a matter of gluing the rim into place as shown. Then I routed the inside edge curvature with a flat-bottom cove bit and the outer edge with a flush trimming bit. And then lots of sanding and several coats of sealer and many more layers of lacquer to weatherproof it. While it’s not directly exposed to the elements, it is in a screened-in sunroom.
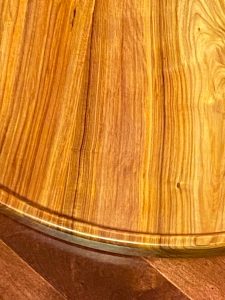
Here is a close-up of the finished edge as well as the back side:
As you can see, I’m loving the challenges that woodworking presents. This is exactly what I want in my retirement. Can you tell that I’m enjoying life! ?
The availability of ready-made furniture is omnipresent and seldom does one consider how long it takes to make a finished product, especially when it’s a one-of-a-kind piece. During a project, I captured several in-process photographs to show the steps often required to produce custom furniture.
When a client explains their wishes, the process starts with lots of questions regarding use, size, shape, wood specie, desired finish, time frame, etc. Even for a simple project such as a customer furniture table with 4 legs, I always start with some sketches.
Breadboard or Trim Table Top?
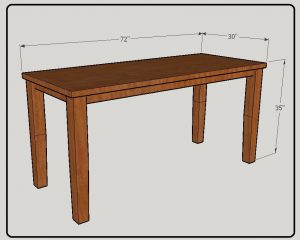
The drawings becomes more refined after some feedback so the client can envision the finished product better.
More Refined Table Drawing
The real fun starts once I’m given the “go-ahead” and a deposit (often to cover the material costs). Sometimes I will make a more detailed drawing for myself to better visualize a joint. I would prefer to make a mistake on paper rather than once I start cutting wood as it’s a lot less expensive.
We are most fortunate to have Cormark International here in Weaverville, NC, a supplier of both domestic and foreign wood species. I was able to hand select my lumber from a large pallet load of kiln-dried oak in 4/4s dimensions.
Rough Cut Lumber
One purchases at a lumber yard a 1″ X 12″ that is actually 3/4″ X 11 1/4″. At Cormark, buying rough cut lumber allows for the final dimensions to be thicker and more stable. So, 4/4s dimensions, pronounced “four quarters” is a true 1″ thick and a 6/4s would be 1-1/2″, etc..
The wood preparation starts at a planer to achieve a final thickness. In this case, I planed all the wood to be 7/8″ thick which removed the rough cut saw marks. And then I started cutting the leg components as well as the table top sections. The legs’ “quarter sawn” wood faces will be exposed more than the end cuts is shown below.
Gluing little wood “biscuits” into the table top edge joints strengthened it along the full length of the board.
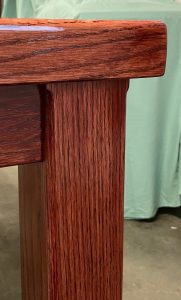
Creating mortices and tenons is a time consuming but rewarding process. The “double” inlay not only strengthened the joints but also hid any glue pushout.
With the legs’ edges routed using a 1/2″ round-over bit, it was time to dry assemble the components to make sure everything fitted in place.
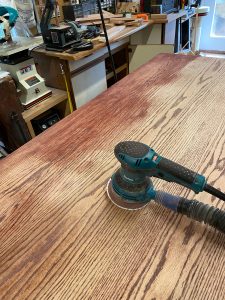
Sanding and Staining
It was time to start the tedious but all so critical process of sanding everything. I disassembled all the components and depending on the surface, I started with 60 or 80 grit (very course) sand paper and progressively moved up to 100, 180 and then 220. I started over again after staining if I didn’t like what I saw. Note in the left photo below the “splotchiness” (if this isn’t a word, it should be). I had applied a wood stain wood conditioner meant to prevent such so this was discouraging. But after a total of 5 stain coats and 5 polyurethane coats, I achieved a finish end result.
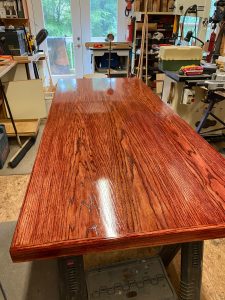
Finishing Touches
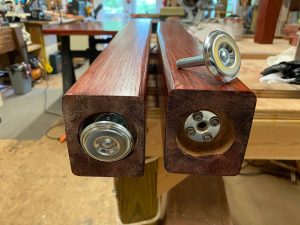
Finally I achieved a stain and polyurethane finish of which I approved. For the legs, I drilled and inserted some “equalizers” knowing that the table was going onto a tile floor which sometimes can be uneven.
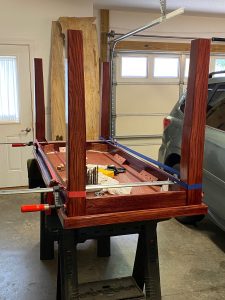
It was time for final assembly and glue-up with the finish dry. In my case, I had to transport everything upstairs in components from my basement which was no small undertaking. When originally designing this home, I suggested building my shop at street level and having our kitchen in the basement but my wife didn’t like the idea.
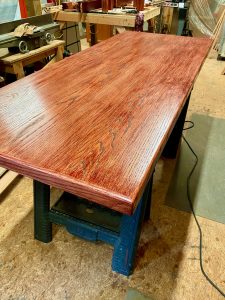
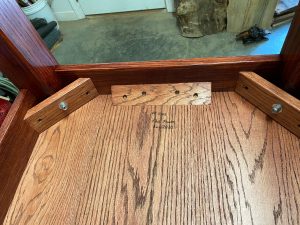
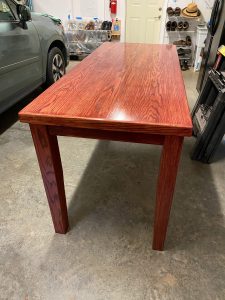
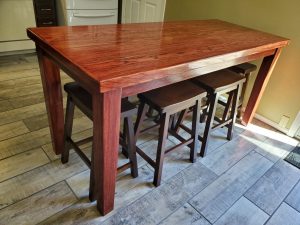
After clamping and gluing, the finishing touch was to add some structural components and then finally a signature. I number all my projects and maintain a log for my own reference. Shown below is the finished table both in my garage as well as the client’s home.
The actual hours that go into a project often far exceed the estimated hours when making a quotation. I once asked a fellow woodworker how he estimated his hours when pricing customer furniture, and he started laughing. But his advice was sound and one by which I live.
Sound Advice:
It was something like this: Unless you’re in the elite league making very high end furniture for high end clients, you have to price things where they are affordable and realistic. Saying that, you have to give a fair estimate as to your hours and don’t think about it again. Be happy with the price quoted as long as it’s fair to both parties but more importantly, be happy with the end result you are delivering.
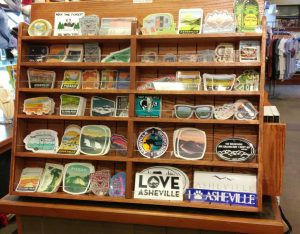
I’ve been fortunate to be the “go to” person by The Asheville Shop personnel for small wood displays that require customization. This store is part of the Visitor Center at the Asheville Chamber of Commerce. Over the past few years, I have made a dozen or so different things for them.
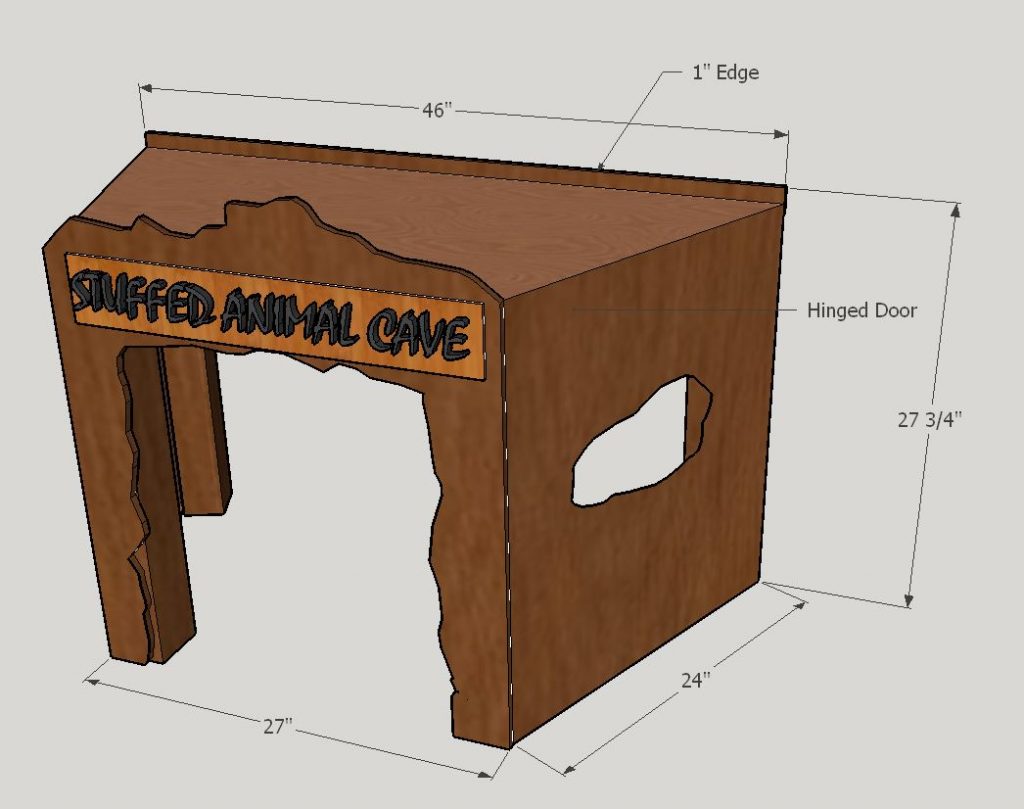
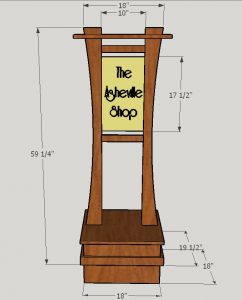
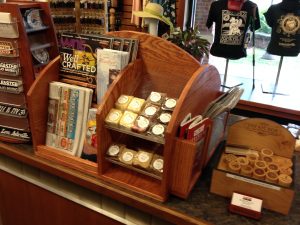
I like working with the staff at The Asheville Shop because they have allowed me some latitude in the creation of the idea(s). For instance, one time they said they needed a trapezoid table to fit a certain space under which they would place stuffed animals with which the kids could play and hopefully the parents would buy. Hearing that, I proposed the Stuffed Animal Cave drawing which was immediately approved. Other projects ranging from a sign standard to point-of-purchase displays to pedestals and podiums are part of my creations. Here are a few pictures of some of the items I’ve made:
Stuffed Animal Cave DrawingMaple Pedestal
Store SignInitial Store Sign Drawing
Multi-Purpose DisplayDecal Display
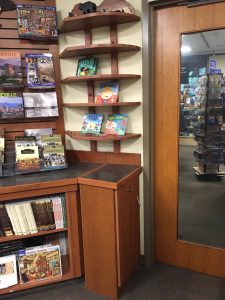
Children Book Shelves
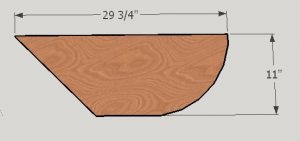
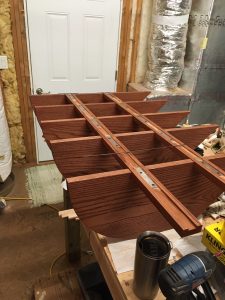
Recently, they mentioned they needed a small bookshelf for kids’ books. It had to fit a certain corner which called for odd shaped shelves
Uniquely Shaped Shelves
and they wished for no mounting hardware to be visible. That was a challenge. I’ve installed “floating shelves” where the support mechanism is hidden within the shelf, but that calls for much thicker wood, which is not only expensive, but also a lot heavier than what was needed. Recognizing also that the position of the shelf would not align well with the wall studs, the challenge only increased.
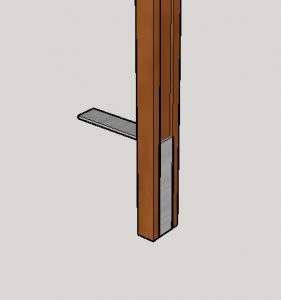
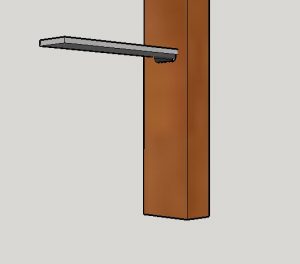
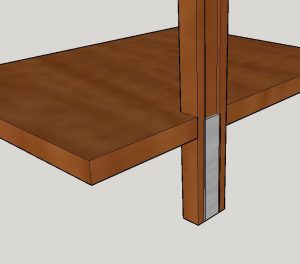
Well, I “invented” this concept which I’ll try to picture here:
Metal L-Bracket Embedded in UprightL-Bracket Protrudes Thru Front of Upright
Bracket Hidden Within Shelf
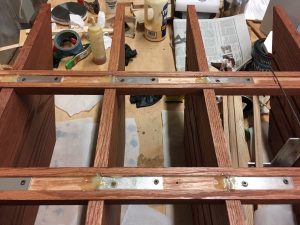
The upright would be mounted against the wall hiding the L-brackets embedded within both the vertical piece as well as the shelves. While in my shop, I epoxied all the pieces to make it one solid shelf unit and no hardware was exposed.
Assembled Shelves in ShopAll components epoxied together
Finished Results:
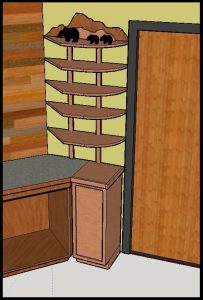
Here is a picture of both my proposed design and the finished result:
Proposed Drawing for Children Book Shelves
Installed Children Book Shelves
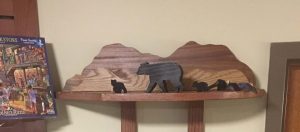
And to add icing to the cake, they allowed me to enhance the top shelf with a mountain scene and a momma bear with two cubs.
Momma Bear & Two Cubs
Is there any wonder why I like working for the people at The Asheville Shop? I hope someday you’ll have a chance to visit the store.
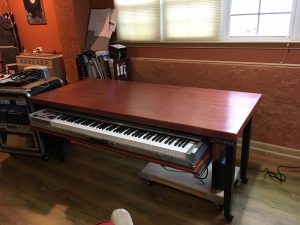
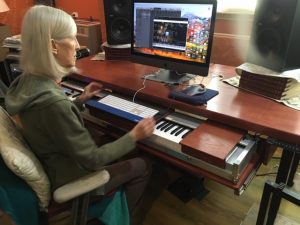
A client asked whether I could do some custom woodworking and add a pullout piano keyboard shelf to an UPLIFT Desk®? Doesn’t sound difficult, does it? This is a motorized table that allows the user to adjust its height for standing or sitting or anywhere in between. Barbara is a pianist and composer and has lots of studio equipment for recording her creations. But most important is to have the speakers in line with her ears and adjusting the table height is critical.
UPLIFT Desk® with Keyboard Shelf
Naively, I said “Sure, I can do it.”
I did some initial drawings such as this to show her the concept. Granted, this drawing has the shelf “floating” in space but, heck, that was beside the point. All I needed was some measurements and I would start making sawdust.
Well, it wasn’t as easy as it sounded. I soon realized I was in for a challenge. Even with some explicit schematics from the UPLIFT Desk® company, there remained several measurements that were needed. And in all truth, it wasn’t until the components arrived in my shop that I was finally able to take finite dimensions and adjust the shelf support mechanism accordingly.
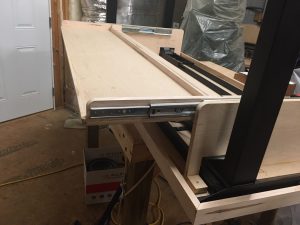
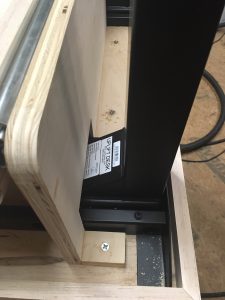
Structural Pieces to Avoid
There were all kinds of structural pieces that had to be considered before mounting a pullout drawer that was to support potentially 200+ pounds. Here is what it looked like up-side-down in my shop (before & after staining).
The piano keyboard shelf shown up-side-downUPLIFT Desk® Leg & Shelf Slide Support
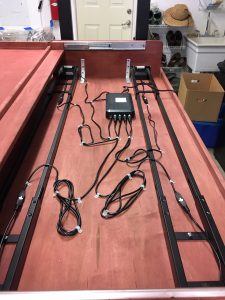
UPLIFT Desk® Under Structure & Wiring
Kudos to UPLIFT Desk®
By the way, before I go any further, I would like to compliment UPLIFT Desk® for a well-made, well-engineered, well-packed, easy to put together product and it operates flawlessly. It’s so quiet and seeks predetermined settings perfectly. Thank you, UPLIFT Desk®, for making my woodworking job a little easier.
But, back to my saga. You can see from the photos a lot of pieces had to be considered before making “sawdust.” The slide out drawer had to have very study side panels that spanned or avoided the metal desk structure and the wiring. Supporting a keyboard width of 62”, the drawer had to be soundly mounted with no sideway torque. Furthermore, the keyboard along with some “thingies” as Barbara and I called them had to clear the desk mechanism when slid in.
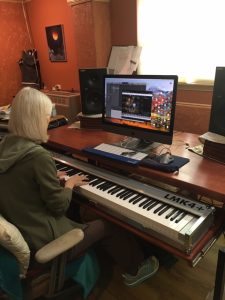
Barbara Playing the Piano Keyboard
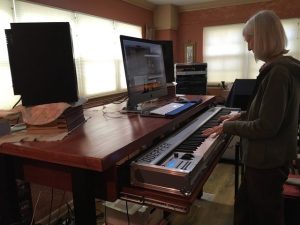
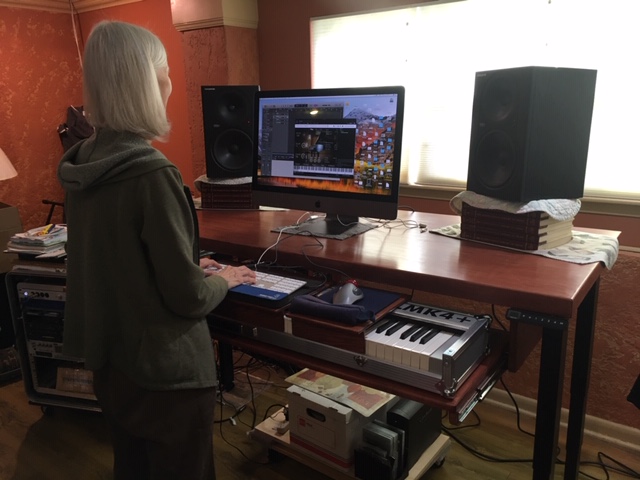
Barbara Standing at the Keyboard
The wood “thingy” sits on top of the piano keyboard to accept her mouse and pad.
The first two pictures above shows the piano keyboard shelf extended and Barbara sitting, then standing. When she wishes to type things on her computer, she moves its keyboard and mouse to the wood “thingies” I built to sit on the musical keyboard (note the mouse thingy on right side.) When needed, she can adjust the table to stand as shown below.
Pianist Standing at Electronic Piano Keyboard
While I was challenged with this woodworking project, it’s a trial like this that keeps me engaged and focused in my retirement. Not that I didn’t mutter a few words under my breathe in the process, the reward was seeing Barbara extremely happy with the results and excited to be working on her music in this new way. Now her body will be in harmony with her beautiful music.
Do you wish to see Barbara operating her UPLIFT Desk®? Click on this link:
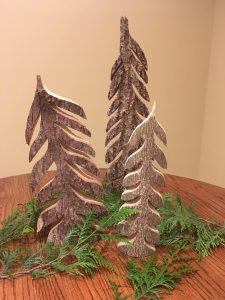
In 2018 and 2019, SilverHawk Woodworking made financial donations to the Full Moon Farms Animal Sanctuary and the Brother Wolf Animal Rescue. Following the popular Fall Weaverville Art Safari, SilverHawk displayed his Bark Tree woodcraft at various locations. He then donated 50% of the gross sales to the charities mentioned. In total, they have received $375 over the two years.
“I’m retired and am not relying on my woodworker’s income for a livelihood. I have enjoyed donating a good percentage of my SilverHawk income to various causes”, according to Phil Pratt, owner. Some of the recipients have been Rotary International plus other very worthy causes such as Helpmates, the Boy Scouts of America, and some needy individuals . In total, for the two years 26% and 39% of the business’s net income have been donated to charity.
Pratt is also a member of the Asheville Breakfast Rotary Club and participates frequently in various service projects locally. The motto of Rotary is “Service Above Self” and this local club donates annually over $40,000 to various charities. Also, as a member of the Asheville Area Chamber of Commerce, Pratt has moderated for 7 years the Thursday Professional Networking Group that meets weekly.

 was needed. I thought about gluing two layers of wood together, but they would have had their own unique grain pattern. This would not achieve my objective.
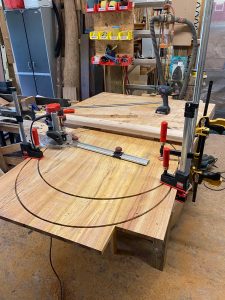
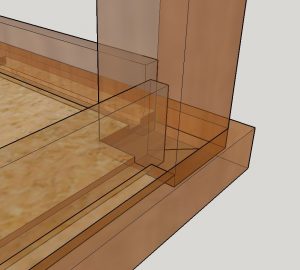 The real fun starts once I’m given the “go-ahead” and a deposit (often to cover the material costs). Sometimes I will make a more detailed drawing for myself to better visualize a joint. I would prefer to make a mistake on paper rather than once I start cutting wood as it’s a lot less expensive.